写在前面的话:
本文系列是教大家如何编写简单的jvm虚拟机,后面我们叫它HadLuo-JVM 。你不需要懂go语言。过程中我会详细解释go语言的语法等。你必须要懂java和jvm。
上篇文章我们实现了解析从class文件,今天我们来讲下如何实现JVM的运行时数据区-Java虚拟机栈。
java虚拟机栈理论知识,必须先看下:
java虚拟机栈是当线程运行的时候就会创建一个,属于线程运行数据区,我们新建一个runtimes 包,然后建一个线程运行数据区,thread.go :
/***线程运行数据区 : pc寄存器 + 虚拟机栈*/type ThreadRuntime struct {// pc 寄存器 pc int// 虚拟机栈 stack *Stack}// 构造实例方法func NewThread() *ThreadRuntime {// 栈大小1024,支持1024次方法嵌套 return &ThreadRuntime{stack: newStack(1024)}}
newStack为构建虚拟机栈的方法,参数为最大栈大小。这里大小直接写死1024了,也就是方法嵌套最多1024次。
新建一个 stack.go :
// 虚拟机栈: 由许多栈帧 构成type Stack struct {// 栈的容量(最多可以容纳多少帧) maxSize uint//当前大小 size uint//栈顶指针 topFrame *Frame}// 构造栈实例func newStack(maxSize uint) *Stack {return &Stack{maxSize: maxSize}}
然后定义入栈,出栈等基础方法:
// 栈帧入栈func (this *Stack) push(frame *Frame) {if this.size >= this.maxSize {panic("HadLuo-JVM温馨提示: java.lang.StackOverflowError")}if this.topFrame != nil {// 将当前入栈的frame 的next指向之前的 栈顶frame frame.next = this.topFrame}// 新的frame 变成栈顶 this.topFrame = frame// 元素++ this.size++}// 栈帧出栈func (this *Stack) pop() *Frame {if this.topFrame == nil {panic("HadLuo-JVM温馨提示: 栈是空的!")}// 取出栈顶 元素 curTop := this.topFrame// 由于要出栈,栈顶元素应该要变成 curTop的next this.topFrame = curTop.next// 把取出的这个frame的next置为空,好回收 curTop.next = nilreturn curTop}// 返回栈顶元素func (this *Stack) top() *Frame {if this.topFrame == nil {panic("HadLuo-JVM温馨提示: 栈是空的!")}return this.topFrame}
下面我们定义栈帧结构,新建一frame.go:
/***栈帧: 保存方法执行的状态,包括局部变量表(LocalVariable)和操作数栈(OperandStack)等。一个栈包含的所有栈帧都是通过链表连起来的。*/type Frame struct {// 链表的下一个节点 next *Frame// 局部变量表 (数组) localVars LocalVars// 操作数栈指针 operandStack *OperandStack}func NewFrame(maxLocals uint, maxStack uint) *Frame {// 执行方法所需的局部变量表大小和操作数栈深度是由编译器预先计算好的,存储在class文件method_info结构的Code属性中 return &Frame{localVars: newLocalVars(maxLocals),operandStack: newOperandStack(maxStack)}}
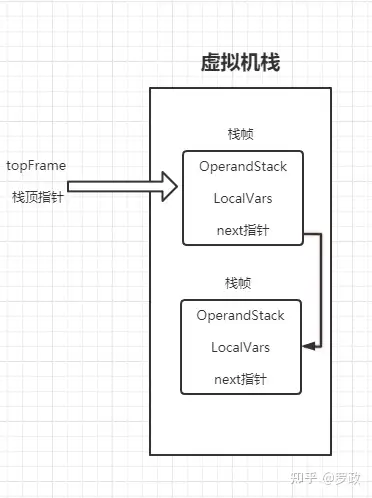
到此,我们应该能画出来我们的jvm虚拟机栈的数据结构了哦:
虚拟机栈:由多个栈帧组成。栈帧:由操作数栈,局部变量表,指向下一个栈帧的next指针组成。
接下来重点就是我们的局部变量表和操作数栈了
局部变量表
新建一个local_vars.go:
/***局部变量表的槽结构体局部变量又分为2个类型: 基本数据类型(long ,double占两个槽位,其余1个) + 引用类型(占1个槽位)*/type Slot struct {// 基本类型: int ,long ,float,double... num int32// 引用类型指针 ref *Object}// 局部变量表是有多个变量的,所有是一个槽数组(编译期间就确定了槽的大小了)type LocalVars []Slot// 通过 固定maxLocals大小 构建槽数组func newLocalVars(maxLocals uint) LocalVars {if maxLocals > 0 {// 构造槽数组 return make([]Slot, maxLocals)}return nil}
局部变量表实际就是一个Slot数组,Slot代表就是一个java方法的参数变量,变量类型包括基本类型和引用类型。
引用类型由于不知道具体是什么类型,于是由Object结构体代替,新建一个object.go文件:
/**表示任何引用类型 */type Object struct {}
下面定义一系列操作局部变量表槽的方法:
// 存int 变量func (this LocalVars) SetInt(slotIndex uint, val int32) {this[slotIndex].num = val}// 取 int 变量func (this LocalVars) GetInt(slotIndex uint) int32 {return this[slotIndex].num}// 存 float 变量func (this LocalVars) SetFloat(slotIndex uint, val float32) {// float变量可以先转成int类型,然后按int变量来处理 this[slotIndex].num = int32(math.Float32bits(val))}// 取 float 变量func (this LocalVars) GetFloat(slotIndex uint) float32 {return math.Float32frombits(uint32(this[slotIndex].num))}// 存 long 变量 , long类型占两个槽位//Int16 意思是16位整数(16bit integer),相当于short 占2个字节 -32768 ~ 32767//Int32 意思是32位整数(32bit integer), 相当于 int 占4个字节 -2147483648 ~ 2147483647//Int64 意思是64位整数(64bit interger), 相当于 long long 占8个字节 -9223372036854775808 ~ 9223372036854775807func (this LocalVars) SetLong(slotIndex uint, val int64) {// long变量则需要拆成两个int变量 this[slotIndex].num = int32(val) // 取前4字节 放到第一个槽位 this[slotIndex+1].num = int32(val >> 32) // 取后4字节 放到第二个槽位}// 取 long 变量func (this LocalVars) GetLong(slotIndex uint) int64 {// 第一个槽,存的是 int64的 低4字节 low := uint32(this[slotIndex].num)// 第二个槽,存的是 int64的 高4字节 high := uint32(this[slotIndex+1].num)// 合并 返回 return int64(high)<<32 | int64(low)}//double变量可以先转成long类型,然后按照long变量来处理。func (this LocalVars) SetDouble(slotIndex uint, val float64) {bits := math.Float64bits(val)this.SetLong(slotIndex, int64(bits))}func (this LocalVars) GetDouble(slotIndex uint) float64 {bits := uint64(this.GetLong(slotIndex))return math.Float64frombits(bits)}// 引用数据类型func (this LocalVars) SetRef(slotIndex uint, ref *Object) {this[slotIndex].ref = ref}// 引用数据类型func (this LocalVars) GetRef(slotIndex uint) *Object {return this[slotIndex].ref}
通过上面这些工具方法,我们就可以对槽作任何的存取数据了。也许你会奇怪,java还有byte,boolean类型啊,为什么你不实现? 原因就是:对boolean、byte、short和char类型定义存取方法,这些类型的值都可以转换成int值类来处理。
操作数栈
操作数栈也是一个栈结构。实现方式和局部变量表类似。我们新建operand_stack.go:
/***操作数栈操作数栈的大小是编译器已经确定的*/type OperandStack struct {//栈顶位置 top uintslots []Slot}func newOperandStack(maxStack uint) *OperandStack {if maxStack > 0 {return &OperandStack{slots: make([]Slot, maxStack)}}return nil}func (this *OperandStack) PushInt(val int32) {this.slots[this.top].num = valthis.top++}func (this *OperandStack) PopInt() int32 {this.top--return this.slots[this.top].num}//float变量还是先转成int类型,然后按int变量处理func (this *OperandStack) PushFloat(val float32) {bits := math.Float32bits(val)this.slots[this.top].num = int32(bits)this.top++}func (this *OperandStack) PopFloat() float32 {this.top--bits := uint32(this.slots[this.top].num)return math.Float32frombits(bits)}func (this *OperandStack) PushLong(val int64) {this.slots[this.top].num = int32(val)this.slots[this.top+1].num = int32(val >> 32)this.top += 2}func (this *OperandStack) PopLong() int64 {this.top -= 2low := uint32(this.slots[this.top].num)high := uint32(this.slots[this.top+1].num)return int64(high)<<32 | int64(low)}func (this *OperandStack) PushDouble(val float64) {bits := math.Float64bits(val)this.PushLong(int64(bits))}func (this *OperandStack) PopDouble() float64 {bits := uint64(this.PopLong())return math.Float64frombits(bits)}func (this *OperandStack) PushRef(ref *Object) {this.slots[this.top].ref = refthis.top++}func (this *OperandStack) PopRef() *Object {this.top--ref := this.slots[this.top].ref// 置为nil ,go就会回收这个 ref this.slots[this.top].ref = nilreturn ref}
下面我举个例子,来搞懂局部变量表和操作数栈是个什么东西?
比如有下面代码:
public static float circumference(floatr){float pi=3.14f;float area=2*pi*r;return area;}
反编译后的指令为:
00 ldc #402 fstore_103 fconst_204 fload_105 fmul06 fload_007 fmul08 fstore_209 fload_210 return
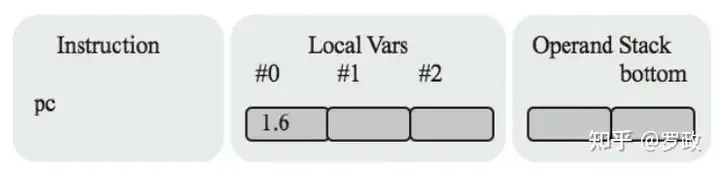
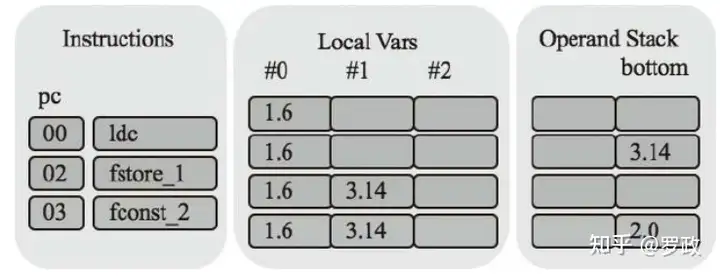
circumference 方法的局部变量表大小是3,操作数栈深度是2。假设调用方法时传入的参数是1.6f。 方法开始执行前,栈帧的状态如下:
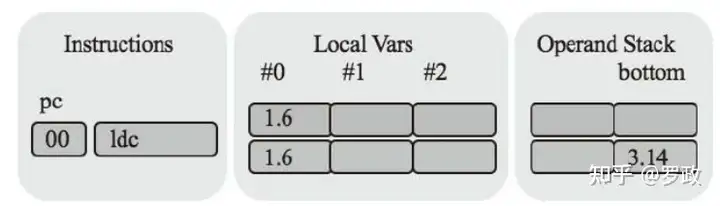
第一条指令 ldc ,把3.14f 推入操作数栈顶:
注意: 图上面一行为 前面的状态,下面一行才是最新的状态。
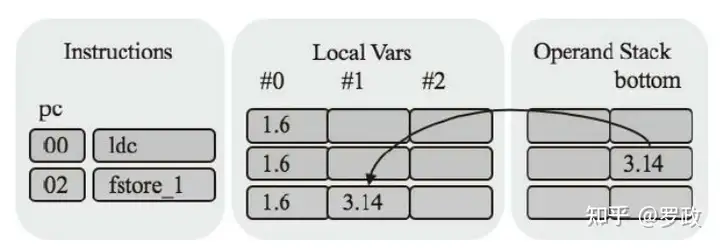
第二条指令fstore_1 ,把操作数栈顶弹出放入到局部变量的slot1中(#1):
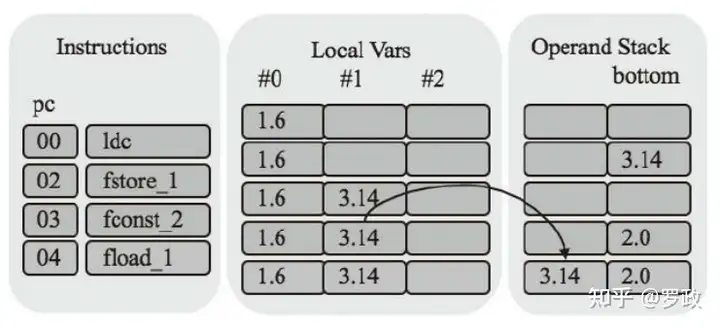
第三条指令fconst_2 , 把2.0f推到操作数栈顶,如图:
第四条指令fload_1 , 把局部变量#1 槽 推到 操作数栈顶,如图:
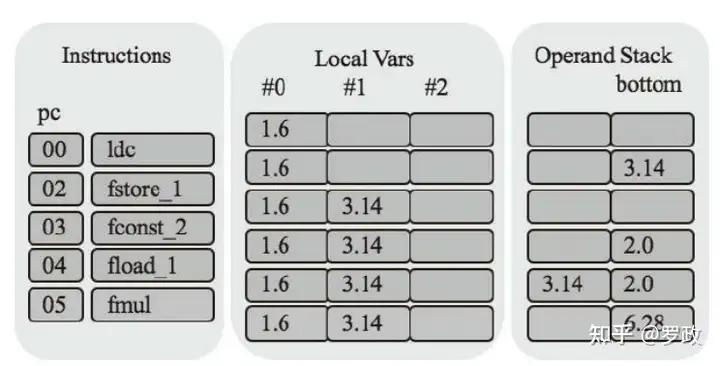
第五条指令fmul,执行浮点乘法。把操作数栈顶的两个元素取出相乘 ,然后把结果推入到操作数栈顶。如图:
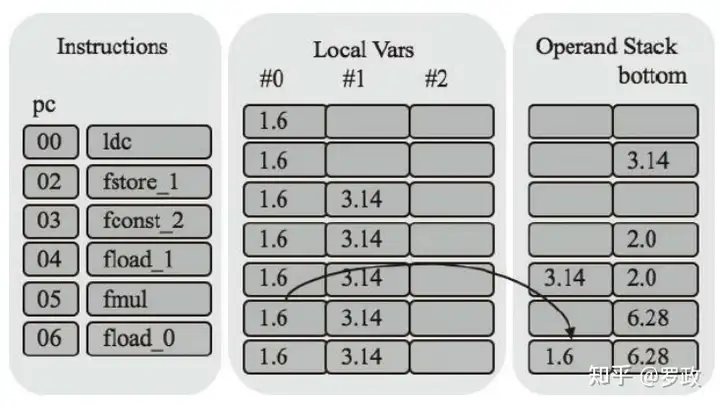
第六条指令fload_0 , 把#0位置变量推入到操作数栈顶,如图:
第七条指令fmul,继续执行操作数栈顶的2个元素的乘法运算,如图:
第八条指令fstore_2,把操作数栈的10.048弹出,放入到#2位置:
第九条指令fload_2,把#2元素推入到操作数栈顶:
第十条指令return,将操作数栈顶元素返回给方法调用者。
到此,你应该知道局部变量表和操作数栈是干嘛的了吧。下面我们来测试下我们今天写的栈代码,修改我们的startJVM方法:
func startJVM(cmd *Cmd) {frame := runtimes.NewFrame(100,100)// 在 #0 位置 设置一个100 frame.GetLocalVars().SetInt(0,100)// 在 #1 位置 设置一个 23.4 frame.GetLocalVars().SetDouble(1,23.4)// 取出 #0位置 的值 println(frame.GetLocalVars().GetInt(0))println(frame.GetLocalVars().GetDouble(1))}//------打印结果---------100+2.340000e+001
测试我们的栈帧中的局部变量表的功能正常!
推荐一个Java架构师博客,带你一起写架构:


暂无评论数据